
Access
Connect cross-platform accounts & identity management
Get a 360 view on game health by combining crash reporting, performance analytics, build quality and binary distributtion into one toolbox
Armada is a dynamic game server manager that utilizes a mixture of bare metal and cloud services to help reduce hosting costs for you, while still maintaining the best performance and experience for your players. Armada allows you to have multiple fleets of servers, which can be spread across different regions, providers, or infrastructure types.

Armada allows you to take advantage of several features designed to ensure your players have the best gaming experience possible.
Provider-agnostic approach Armada allows you to choose between multiple providers, depending on your hardware requirements. You can decide to have 100% of your servers in AWS cloud if you have free credits, or you can choose to have 90% of your game servers hosted using dedicated bare metal with the last 10% being scaled into cloud if you wish to bring your costs down. Armada allows you to pick and choose exactly what hardware you want, from whoever you want without any limitations!
Cost-aware scaling Armada ensures that hosting costs are taken into account when scaling up or down. When scaling up, Armada will prioritize filling bare metal machines before bursting into the cloud. When scaling down, Armada looks for opportunities to reduce the load on the cloud machines without impacting performance or player experience.
Multi-region hosting Armada has been designed for greater global coverage and better game performance across more regions. With Armada you aren’t tied to one hosting solution, which means you can make sure that your hosting providers cover each other’s blind spots. Mix and match providers, hardware types, and regions based on your player demands.
Integrated matchmaking and lobby Armada connects directly with AccelByte Cloud’s Matchmaking and Lobby services to provide geolocation support, so that you can match players in the same region for optimal player experience. If you already have a matchmaking and lobby service you prefer, we can help you integrate Armada with that instead of using AccelByte Cloud’s.
Unsure what hardware to use? If you are unsure what dedicated bare metal provider to use, what regions you want or you have only ever used cloud, the Armada team is here to help! We can advise on everything from specific hardware types to use, how your game servers will perform, and which regions will be best to support all your players. We have partnered with a number of dedicated hardware providers who already cover the majority of popular regions across the globe.
Before we can get you set up with Armada, our team will need some information about your game and players. This will help us accurately price out the hardware you’ll need, as well as make sure your hosting covers the right locations to give your players the best experience possible.
Player counts For us to provide the best experience possible, we need to know some information about your players. First, we need to know the maximum number of players that can connect to your game server. We also need to know what your estimated average number of players will be over the course of a month, as well as the estimated peak number of players. With these player numbers, we can ensure that you have enough bare metal to cover the average player count, as well as ensuring that you can scale effectively into cloud to meet peak demand when things get busy.
Player locations With Armada, you can host your game server sessions pretty much anywhere in the world. While this is a great achievement, we are also aware that some games are more popular in different parts of the world than they are elsewhere. It is important for us to know where the majority of your players are based, so that we can deploy bare metal and cloud instances as close to them as possible. The closer the hardware, the better the performance. Your players deserve the best possible experience every time they play your game!
Game server resource requirements Every game server that you deploy will have some form of CPU and RAM usage. In order to provide the best possible performance for your players, Armada needs to know what the worst case scenario is in terms of resource usage requirements. To do this, you will need to run a session with the maximum number of players connected, using the most resource intensive map and game mode possible. During this session, you should record the CPU, RAM and network usage over a full match.
Once you have this data, the Armada team can then run it through our calculator. This will tell us exactly how many game server sessions we can safely fit on your bare metal and cloud server instances without impacting the game server performance. More importantly, it will also allow us to calculate the best distribution of bare metal and cloud to ensure you always have capacity for your players as well as lowering the cost for hosting.
Here are some common terms in the Armada documentation, and their definitions:
Armada AccelByte’s product. A suite of tools, services, and SDKs used to enable multiplayer for a game
DSM/DSMC/Dedicated Server Manager One of Armada’s components that acts as the brain of Armada. This service stores deployment configurations that are defined from the Admin Portal and communicates with Nomad to deploy dedicated servers to be used in matchmaking.
DS/Dedicated Server/Game server/Authoritative server A counterpart for game clients in multiplayer architecture. Game clients connect to the game server during play sessions and have the server run all the game logic. In Armada, the traditional game server binary is containerized and deployed as a Docker container in a Nomad cluster. This running DS container is sometimes referred to as a pod.
DS Logs Logs generated by a running dedicated server. Game developers can download full DS logs from the Admin Portal.
DS Uploader A tool for game developers to upload the dedicated server binary to Armada. Upon upload, Armada’s services will containerize the server and store it in a Docker image repository.
Game Session An active play session where a game client is connected to a game server. In Armada, a game session can be created through matchmaking.
Armada configuration/Dedicated server configuration Settings where game developers specify how the game’s dedicated servers will be deployed. The configuration consists of:
QOS/Quality Of Service A set of services that are deployed in each of the regions where Armada can spawn dedicated servers. Using the SDK, game clients can call the QOS in each region to measure network latency and determine the nearest region to ensure that matchmaking pairs players that are near each other.
Make sure you’re authorized to use our services and have the following permissions before you use Armada:
| Usage | Permissions | Action |
|---|---|---|
| Register a New Game Session | NAMESPACE:{namespace}:DSM:SESSION | Create |
| Claim a DS for a Game Session | NAMESPACE:{namespace}:DSM:SESSION | Update |
| Retrieve terminated servers in a specific namespace | ADMIN:NAMESPACE:{namespace}:DSAM:SERVER | Read |
| Download the DS Artifact file. | ADMIN:NAMESPACE:{namespace}:DSAM:ARTIFACT | Read |
| Check DS Artifact's existence before downloading the file. | ADMIN:NAMESPACE:{namespace}:DSAM:ARTIFACT | Read |
| Retrieve terminated servers in all namespace | ADMIN:NAMESPACE:{namespace}:DSAM:SERVER | Read |
Permissions work slightly differently depending on whether they are assigned to IAM Clients (opens new window) or Roles (opens new window) assigned to users. For more information, read the Authentication and Authorization (opens new window) documentation.
For each multiplayer game that you wish to host using Armada, you will need a fleet of bare metal servers as well as access to some virtual cloud instances. This will ensure that you have the capacity needed to service your players.
As Armada is completely provider agnostic, you can source hardware from different providers depending on your needs, as well as utilize any and all cloud providers. What’s more, if you are unsure what providers to use or do not have the ability to organize your own hardware, the Armada team can source and deploy this for you using our recommended providers.
Each bare metal server and virtual cloud instance will have your multiplayer game server deployed to it so that when players make a matchmaking request, Armada will be able to start an instance based on the required location and instance priority.
Armada has a powerful priority system that allows you to specify what hardware or instance types should be used first to service your players. You may have a large fleet of bare metal servers, and also a bunch of credits provided to you from one of the many cloud providers. With Armada, you can choose if you want to burn through your credits first, or place your players on the bare metal capacity until the point where they are completely full and then burst into the cloud. The choice is entirely yours!
Armada works by connecting dedicated servers from different providers. The diagram below shows the flow and different services involved in connecting these servers. Any dedicated servers required are hosted directly on bare metal or cloud infrastructure that is specific to your game.

Below is a diagram of how Armada can work with our Cloud Matchmaking service.

Deployment override is a feature that enables you to override an existing deployment’s configurations if part of that deployment turns out to be unstable, so you can re-enable the previous working version. You can also use deployment override if you want to test a certain feature that has a different game version from your current deployment.
For example, to run the game you need to have a matching Game Client and Game Server. When you override a deployment, if you have 3 different game versions on 3 different development stages, you don't have to create 3 different deployments for each Game Version. You only need to create one Deployment Server that you can override based on the Game Version.
The diagram below outlines how this feature works:


As seen in the diagram above, the override will be activated depending on the version requested by the game client.
Go to the Dedicated Server Management section and open the Configurations menu.

In the Server Configurations menu, click Create Configuration.

After the Create Server Configuration form appears, you will see the first step to create the configuration is about the Timeout configuration. Fill it in with the required information.

Click Next to go to the next step.
Now you will see the Ports configuration panel here. Please input ports where your dedicated server is listening to the configuration.

Click Next to go to the next panel.
The Summary panel will appear. This shows you all information related to the configuration that you have made.

Click Create Configuration to create your new configuration.
You can create multiple, distinct DS deployments for your game that needs more than one DS build. For example, if your game has several different maps that players can choose from you need to differentiate the DS deployments so that each configuration of your game will have a different DS build.
You can differentiate your DS configurations by their Image Version, Pod Configuration, and the Region of the DS in deployment. See the guides below to add differentiation for each parameter in the Admin Portal.
To configure the Image Versions, read the Upload a New Server with DS Uploader (opens new window) section in our Cloud Matchmaking with a Dedicated Server documentation.
New pod configurations can have different CPU, Memory Requests, and also different Parameter arguments. Follow these steps to add a new Pod Configuration.
In the Configuration Details window of the Admin Portal, go to the Pod Configurations tab and click the New Pod Configuration button.

After the configuration form appears, input the fields with the appropriate format.

NOTE
The values for CPU Limit, and Memory Limit must be formatted in Kubernetes, e.g., CPU of 1000 MHz is equivalent to 1GHz and Memory of 1 Megabit is equivalent to 0.125 Megabytes.
Click Create Configuration to create new Pod Configuration.
Once you create a new pod configuration, you will have your details list.
After you have configured a different Image Version and Pod Configuration, you can configure the Deployments. You can add another deployment with a different pod, version, and server region. Follow the steps below to add a new pod configuration.
In the Configuration Details window of the Admin Portal, go to the Deployments tab and click the New Deployment Configuration button.

The Add New Deployment configuration form will appear.

When you're finished, click Next to continue.
The Server Count configuration page will appear. Here, you can set the amount of servers that will be spawned.

NOTE
When you're finished, click Next to continue.
The Image and Pod Config page will appear.

When you're finished, click Next to continue.
The final Deployment Summary page will appear. Check the deployment’s details here before committing the new deployment. If you want to make any changes, you can go back by clicking the Back button, or if you are happy with the configuration, click Create Deployment to create the new deployment.

The new deployment will be added to the Deployment list.
You can patch the DS Image using the same version of the image without having to upload a whole new version. To patch the image version, follow the steps below:
In the Admin Portal, go to Dedicated Server Management and select Configurations.

On the Server Configuration page, scroll down to the Image Server and Deployment section. Under the Image versions tab, you can see a list of the available image versions. Click the ellipsis button for your desired image and select View.

On the Image Server Detail page, under the Image Patch section, click the Add Image Patch button.

Download the version of the dedicated server uploader that matches your operating system. When you're finished, click the Next button.

On the Generate Command page, fill in the fields with the data from your game server:
Once completed, click the Next button.

A command will be automatically generated. You can use this command to upload your game server, but before doing so, ensure that you have replaced the client_id and client_secret with the Client ID and Client Secret for the IAM Client of your DS Uploader. Open the CLI in the folder that contains your DS Uploader and game server and run the command.

The command will contain multiple flags denoting the information you entered earlier. The flags and their meanings are listed below.
| Flag | Shortcut | Description |
| --artifact string | -a | The directory path where artifact files will be stored. |
| --bucket string | -b | The name of your S3 bucket. |
| --command string | -c | The server’s executable command. |
| --s3dirname string | -d | The directory path of your S3 bucket. |
| --debug-enabled | Use this flag to install a debugging package into the server. | |
| --default-image | Use this flag to make this server the default server image. | |
| --deployment string | The deployment that will be used for this image server. | |
| --hostname string | -H | The hostname path of the platform. |
| --id string | -i | The IAM Client ID of your DS Uploader. |
| --namespace string | -n | The namespace of your game. |
| --path string | -p | The local path of the game server. |
| --patch | Use this flag to set the image as the patch of the version. If you don't include this patch, your upload will be uploaded as a new image version. | |
| --secret string | -s | The IAM Client Secret of your DS Uploader. |
| --show-progress | Use this flag to make the server image upload appear in your CLI during the upload. | |
| --version string | -v | The game server version. |
You can also view this information in your CLI by using the command <ds-uploader>.exe --help.
After you create a Dedicated Server Configuration, you should verify that the server has spawned correctly. In the Admin Portal, go to Dedicated Server Management and choose Servers.

On the Servers page you’ll see the elements listed below:
The Local Server page shows the number of dedicated servers that run on your local computer. This type of dedicated server is used to perform testing before a game is published.

The Server Overview page shows the number of dedicated servers you have configured, from both AWS and GCP hosting providers.

You can also sort servers by region.

You can see the details of each server by clicking on the three dots next to the desired server and selecting View.

The Available Regions page shows the number of registered regions that you can run servers in. On this page you can see the status of each region.

The Total Sessions page shows the number of player sessions currently active.

You can search the active player sessions using the Session ID or Match ID.

You can filter the active player sessions based on its region.

To see the session details, click View in the Action column next to the desired session.

The Session Details page appears. Here you can see detailed information about the session.

Armada is able to utilize multiple bare metal providers as well as the cloud. For this to work, each provider you use must be given a priority value which can be changed at any time from the Admin Portal. These priority values determine which servers Armada fills up first before moving to other providers.


TIP
If you want to add a new provider to your environment, contact AccelByte Cloud for more information.

By enabling this, you can override the server version without specifying an override deployment.


When you're finished, click Add and your override deployment will be added to the list.


When you're finished, click the Add button. Your new region-based buffer configuration will be added to the list.
You can check the status history and allocation events of any dedicated server, active or historical, in the Admin Portal. This allows you to see the complete life cycle of a dedicated server, and troubleshoot the server if necessary.
Before you can troubleshoot your dedicated servers, it is important to understand the meaning of each dedicated server status and allocation event.
| Creating | This status occurs when the server is preparing its resource to handle a game session workload. The status will change to Ready once the server confirms its readiness to Armada by calling the RegisterServerToDSM API. If this status is immediately followed by the Removing status, your dedicated server may have crashed. You can check the exit code under a dedicated server’s terminated event to see if an error occurred: an exit code of zero indicates no error, whereas a non-zero exit code indicates an error. If you need help interpreting an error code, please contact AccelByte support. Alternatively, if this status is followed by nothing else in the historical log, the server may have been killed by creation timeout. You can then check the allocation events to see if your server was in the Killing state before it was in the Started state. Another common problem is when the server is still downloading when the creation timeout is reached. In this case, you should be able to see in the Driver state that the Docker image pull progress never reached 8/8, indicating that the download never finished. 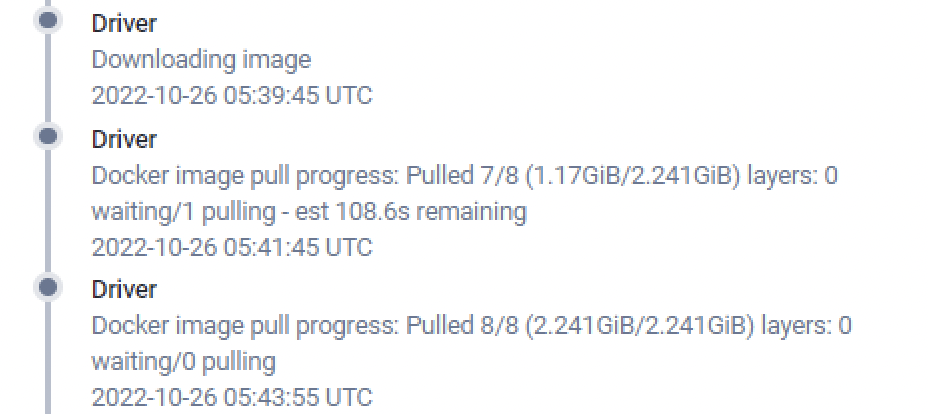 |
| Ready | This status occurs when the server is ready to serve a game session workload. The status will change to Busy once a server is claimed by the matchmaker or a custom service using the claim API. |
| Busy | This status occurs when the server is serving a game session workload. |
| Unreachable | This status occurs when the server has lost its connection to Armada, causing Armada to disown and kill the server. |
| Removing | This status occurs when the server is being removed by Armada. |
| Received | This happens when Armada receives the request to spin up a new dedicated server. |
| Task Setup | This happens when Armada is allocating resources for the new dedicated server. |
| Driver | This happens when the dedicated server container is initializing. You can also see the download status of your dedicated server if it is the first time the server has run on a virtual machine. |
| Started | This happens when the container initialization is completed and the server binary is executed. |
| Signaling | This happens when the dedicated server receives a signal from Armada, usually a termination signal. |
| Terminated | This happens when the dedicated server is terminated. You can also check the exit code of your dedicated server for any errors. |
| Killing | This happens when the container is killed, and the occupying resource is returned to Armada. |
In the Admin Portal, open the Dedicated Server Management menu in the sidebar and click Servers. You can do this in the publisher namespace to browse the complete list of servers across all namespaces, or in a game namespace to see the servers only from that game.

At the top of the Dedicated Server Management page, click the small arrow button next to Server Overview.

The list of active dedicated servers will appear. You can filter this list by Region by selecting the desired region from the dropdown menu, or you can refresh the server data by clicking Refresh Data. When you find the server whose data you want to view, click the ellipsis icon in the Action menu, then click View.

The complete data for the selected dedicated server will appear. On the right side of the page, you can see the server’s Status History and Allocation Events.

In the Historical Logs menu, you can view and download the data saved from a dedicated server that has already been terminated. This includes information like the server’s status history and allocation events, and the dedicated server artifacts which are the files generated during the server's life cycle.
In the Admin Portal, choose the desired namespace.
TIP
Choose Publisher Namespace to see a list of the historical logs from all namespaces. You will be able to see a list of historical logs from a specific game namespace by filtering the logs.
Choose a Game Namespace to see the historical logs from that individual namespace.

In the Admin Portal, go to the Dedicated Server Management section in the sidebar and open the Historical Logs menu.

On the Historical Logs page, you can see a list of the historical logs.

To filter the historical log results, click the More Filter button.

You can use the following filters to narrow down your search results:
The Namespace filter shows logs from a specific namespace only. This filter will only appear if you are in the publisher namespace. Choose All to show results from all namespaces.
NOTE
If you choose All, you will also see results from all deployments.
The Server Status filter shows logs from a particular deployment only. Choose All to show results from all deployments in the selected namespace.
NOTE
If you want to select one specific deployment, you must first specify a game namespace in the Namespace field.
Use the Start Date and End Date fields to filter your search results to a particular period of time (optional).
Select Done to show the filtered results. The filters you used will be visible at the top of the page. You can remove any of these filters by clicking the X in the desired filter, or Clear all to remove all the filters at once.

You can also search for an historical log by Match ID, Party ID, or Pod Name.

To view historical log’s details, select View.

In the Details page, you can see detailed information about the selected historical log. Allocation Events provides information about every Dedicated Server event occurring from the moment it is deployed until it’s terminated. This helps make debugging easier.


In the Admin Portal, choose the desired namespace.
TIP
Choose Publisher Namespace to see a list of historical logs from all the available namespaces. From here, you can filter the results for a specific game namespace.
Choose a Game Namespace to see the historical logs from that individual namespace only.

In the Admin Portal, go to the Dedicated Server Management section in the sidebar and open the Historical Logs menu.

On the Historical Logs page, you can see a list of the historical logs.

Select the logs you want to download by clicking the box on the right hand side of a log.

To download the log, select the Download Logs button.

NOTE
DS Artifacts can only be downloaded if you have filled the Artifact Directory field when uploading the image version.
If you didn’t fill in the Artifact Directory field when you uploaded your image version, you can patch the image version at any time and fill in the Artifact Directory field before you attempt to download DS Artifacts.
On the Details page of your selected historical log, click the Download Artifacts button.

NOTE
You can only download the DS Artifacts of a server that has been claimed before. Claimed servers are labeled Busy.
Follow the steps below to export a Dedicated Server Configuration from your game namespace.
In the Admin Portal, open the game namespace that contains the configuration you want to export. On the Server Configurations page, click the Export/Import button. Then click Export.

Your Server Configuration will be exported in a JSON file. Here is an example of the contents:
IMPORTANT
If you use our Matchmaking service, don’t forget to also export your Matchmaking Configuration. You will need both configurations if you want to use them in a different game namespace.
Follow the steps below to import a Dedicated Server Configuration into a game namespace.
In the Admin Portal, go to the game namespace where you want to import the configuration. On the Server Configurations page, click the Export/Import button. Then click Import.

The Import Configuration form will appear. Here, select the configuration file that you want to import.

A confirmation window will appear. To confirm your selection, type **IMPORT **in the text box, then click the Import button.

The configuration will be added to your namespace.
IMPORTANT
If you use our Matchmaking service, don’t forget to also import your Matchmaking Configuration. You will need both configurations in this namespace to use Matchmaking with Armada.
