
Access
Connect cross-platform accounts & identity management
Get a 360 view on game health by combining crash reporting, performance analytics, build quality and binary distributtion into one toolbox
AccelByte Cloud’s Lobby service provides continuous connection between your game and players by using WebSocket (opens new window). WebSocket ensures reliable, real-time data transfer by allowing two-way communication between the server and clients. Since the Lobby serves as the main hub of your game, it is related to many of our other services, including:
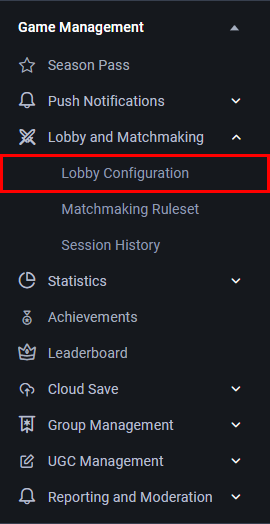
In the Admin Portal, open your game namespace, go to the Game Management section, and click on the Lobby Configuration menu on the left-hand side.

On the Lobby Configuration page, use the following settings to configure your game’s lobby.
Lobby Concurrent User (CCU) shows the total number of active players. This value is refreshed once every minute.

You can temporarily disable the lobby to perform maintenance on your game. When the lobby is disabled, any active players will be forced out of your game, and no players will be able to join the game until the lobby has been re-enabled.

This section includes general lobby settings.

Keep Player’s Activity determines whether a player's activity data is kept after they disconnect from the lobby. Toggle this option On to save the player’s activity upon disconnection.
Cancel Match on Disconnect determines what happens to a player’s match when that player disconnects. Toggle this option On if you want the matchmaking request to be canceled if a player disconnects, or Off if you want the matchmaking request to remain active even when the player has been disconnected.
NOTE
When the toggle is Off, the request ticket will not be canceled, even if the player's connection is momentarily interrupted.
Ready Consent Timeout (Sec) determines how long a player has to confirm that they’re ready to start the match, in seconds. If the player doesn’t confirm that they’re ready before the timeout, their matchmaking request will be canceled. The default value is 20 seconds.
Max Player in the Lobby determines the maximum number of players that can join the Lobby at any one time. The default value is -1, which means that an unlimited number of players can join the Lobby.
Max Server Waiting Time (sec) determines the amount of time your game will wait for a server to be spun up for a match. If this time limit is exceeded, the Lobby will respond that no server is available.
This section contains Cloud Party settings.

NOTE
These settings also apply to party leaders. If the party leader is removed from their party, the player that has been in the party longest will be automatically promoted to party leader.
This section contains Cloud Chat (opens new window) settings. Its settings work together to limit how many messages players can send in the chat, to prevent spamming.

When combined, these two settings determine a rate of messages per unit of time. For example, if the Chat Rate Limit Duration is 1,000 milliseconds and the Chat Rate Limit Burst is 3, then 3 messages per 1,000 milliseconds (1 second) is the rate at which sent messages are considered spam by the Lobby service. This means that chat messages that are sent at a rate of less than 3 messages per second will be sent normally and not be considered spam.
This section contains Entitlements settings.

Entitlement Check determines whether the backend will check if a player has the necessary entitlements before they are granted access to the lobby. This can be used as an additional layer of security to prevent players from accessing games if they have obtained access to a Client ID and Client Secret that allows them to access your game, even if they haven’t purchased it.

Select Item is used to determine which item will be used in the Entitlement Check.
These settings work together to determine how many requests a player can make to the Lobby service before an error is returned.

When combined, these two settings determine a rate of requests per unit of time. For example, if the Duration Limit is 1,000 milliseconds and the Burst Limit is 3, then 3 requests per 1,000 milliseconds (or per second) is the minimum rate at which requests sent to the Lobby will be considered spam by the Lobby service. This means that requests that are made at a rate of less than 3 per second will be handled normally and not considered spam.
Follow the steps below to export the lobby configuration:
In the Admin Portal open the desired game namespace, then go to the Game Management section and open the Lobby Configuration menu.

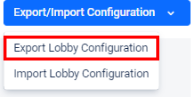
On the Lobby Configuration page, click Export/Import Configuration in the top-right corner of the page, then click Export Lobby Configuration.
The lobby configuration of the selected game namespace will be downloaded to your computer in JSON format.
Follow the steps below to import a lobby service configuration:
In the Admin Portal open the desired game namespace, then go to the Game Management section and open the Lobby Configuration menu.
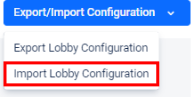
On the Lobby Configuration page, click Export/Import Configuration in the top-right corner of the page, then click Import Lobby Configuration.
The Import Lobby Configuration form appears. Click Select JSON File to browse for the lobby configuration you want to import, then click the Import button.
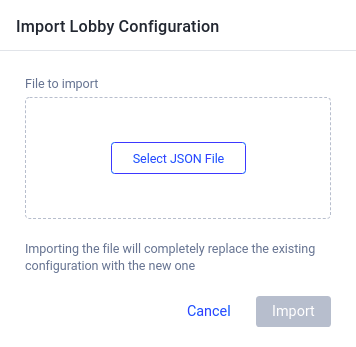
The selected lobby configuration will be imported.
You can connect the AccelByte Lobby service to your game by using the command below:
Once you have set up a Lobby connection, you will be able to implement social features like Presence, Party, Friends, and Chat.
This feature notifies the game of any changes to the connection to the Lobby server. The SDK already provides an auto-reconnect mechanism, but when the auto-reconnect times out you must reconnect manually.
You can use Reject Consent in matchmaking so players can reject a match after they have been matched. This gives players the chance to reject matches right away instead of waiting for the ready consent timer to expire.
